FIND YOUR FIRST ISSUE
Apply for issues on Drips Wave
Find a suitable task, explain how you can help, and wait for your assignment.
Watch this first · 5 minutes
Start with this mobile walkthrough before applying for your first issue. It shows where to find issues, which filters to use, how to prepare your application, and where to check your assignments. Watch here, then use the written steps below as a reminder.
Recorded walkthrough, 5:05. Wave dates, points, availability, and limits shown are examples from the recording. Check the current Wave before applying. The written guide below covers the steps too.
Before you apply
Sign in with your GitHub account and complete Drips identity verification. Have your Plinger setup ready too. If a developer will help you, agree on the scope and timing before committing to an issue.
1. Find an available issue
Open Explore in Drips Wave (new tab), choose a program with an active Wave, then open Issues. Filter for unassigned issues or those without applications. Check the deadline, requirements, and point value before choosing.
On mobile, open the menu and choose Explore Waves. The video shows Preview issues for an upcoming Wave; previewing lets you browse, but check when that Wave opens for applications.
To follow the filters in the video, select Open, Not assigned, and No applications, then press Apply filters. These help narrow the list; an issue with existing applications may still accept yours. Open a task, expand Show more, and use View on GitHub to read the full context.
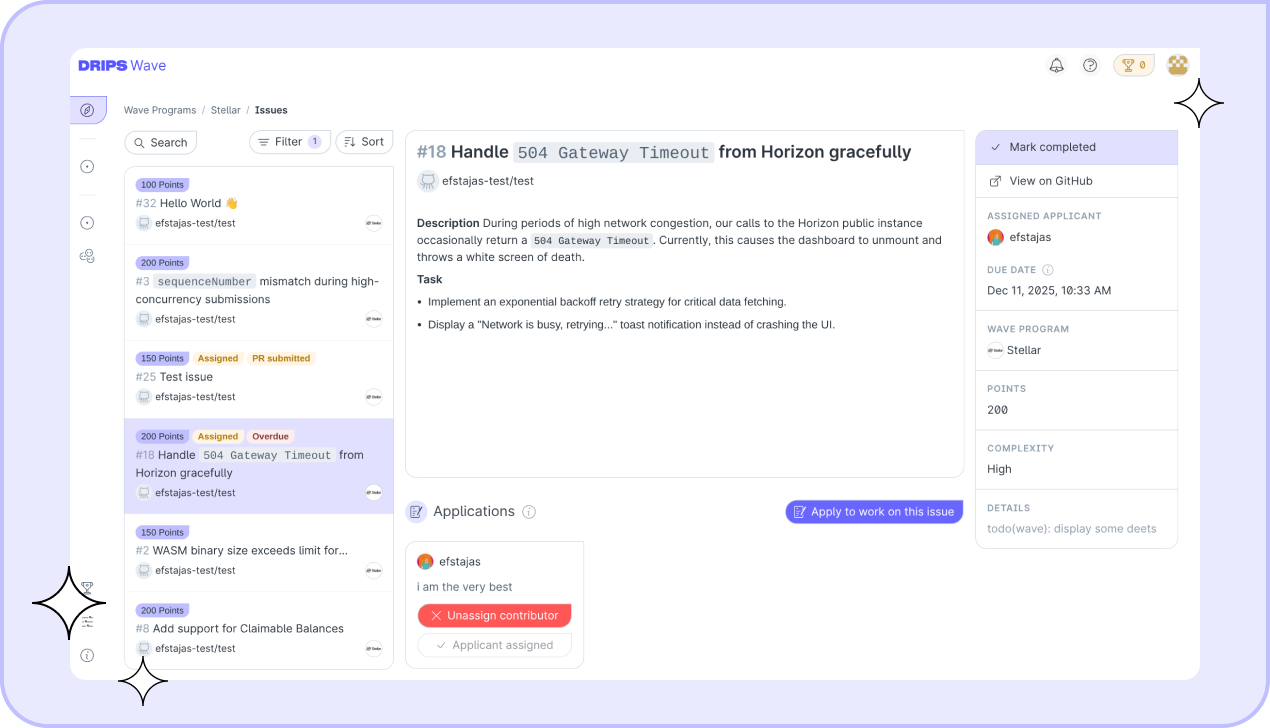
- 1
Left: browse and filter
Use the issue list to compare tasks. Open one to read its full description.
- 2
Centre: understand the task
Read what needs changing and check any linked GitHub details. If a requirement is unclear, ask before promising a solution.
- 3
Right: check the details
Look at the assignment, due date, points, and complexity. A high point value alone doesn’t make a task a good fit.
2. Write a clear application
Select Apply, or Apply to work on this issue. Use the message box to briefly explain your relevant experience and how you would approach the task. Drips’ application FAQ describes this step.
The video uses ChatGPT to help draft a short message from an issue link. If you do the same, read the issue first and review every sentence. Replace any invented skills or experience with true details, and agree on the approach and timing with your developer before submitting.
Make the message specific to the issue. Mention what you understand, the work you can realistically deliver, and any relevant example. Avoid generic applications sent to many tasks. Be accurate about your experience and who will do the work. Drips’ contributor tips explain what makes a useful application.
Review the message and submit your application. Applying expresses interest; it doesn’t guarantee selection or earnings.
Use the AI application template
Watch this 1-minute 24-second example to see how to use the template and get another application by sending just the next issue link.
- Copy the template below and paste it into your AI chat.
- Replace [PASTE ISSUE LINK HERE] with the GitHub link for the issue you want to apply for, then send the message.
- Read the reply and check that the proposed work matches the issue and what your developer can deliver before posting it.
Scroll to read the full prompt. The copy button copies all of it.
Know your application limits
Drips currently lists a maximum of 15 pending applications and 4 assigned issues per organization within a Wave. Check your application limits dashboard (new tab) for the items counting against your allowance.
Limits can change. See the official application-limit rules. Checked 14 October 2026.
3. Let the developers take it from here
Your main job as a scouter is to find suitable issues and apply. When an issue is assigned to you and syncs to Plinger, the developers can see it in their workspace and start working on it.
You don’t need to send each assigned issue to a developer or closely follow every application. The developers use Plinger to pick up assignments and manage the development work.
If you want to check progress, you can view My work in your Plinger workspace while continuing to focus on applying for suitable issues.
If you can’t apply
Drips asks me to verify my identity
Complete verification before applying. Our verification guide covers document preparation and common problems.
I have reached an application limit
Review the limits dashboard. Withdraw applications you no longer intend to pursue or finish existing work. Don’t apply just to fill every available slot.
My application has no response
Check its status under Contributors → Issues. Maintainers may be reviewing several applicants; avoid repeated messages. An application still awaiting a decision isn’t an assignment.